Operations, projects, integrations, and administration how-to
This chapter explains event projects, teams, reports/readiness, navigation, integrations, data requests, site administration, Demo Mode, and AI-agent access. It is for authorized organizers and instance operators; individual accounts see only the actions their permissions allow.
Understand event and site scope
Event routes under /organizer/events/<event-slug> change one event. Site administration under /organizer/admin can affect the installation, provider status, or access model across events. Confirm both the event and the permission boundary before every configuration change.
The presence of a page is not authority to perform a secret, billing, legal, schema, destructive-production, or outward-facing action. Those operations keep their explicit owner and operator gates.
Search organizer records without crossing event boundaries
- Open Organizer search and choose the event whose records you need.
- Enter a narrow name, email, title, organization, or other reliable term.
- Review the result type before opening it; sessions, registrations, sponsors, CFP submissions, expenses, and vendors can share similar names.
- Confirm the event name again on the destination record before taking action.
- Refine or clear the query rather than assuming that no result means no record exists.
Search is deliberately event-scoped. Do not copy private results into another event or broaden access merely to make cross-event discovery easier.
Search within one event
- Open Search inside the intended event workspace.
- Enter a narrow name, email, title, organization, or other reliable term.
- Review the result type before opening it; sessions, registrations, sponsors, CFP submissions, expenses, and vendors can share similar names.
- Confirm the event name and source record on the result before taking action.
- Refine or clear the query rather than assuming that no result means no record exists.
This search never crosses the current event boundary. Return to Organizer search only when you need to choose a different event first.
Run the event overview and readiness checklist
- Open the event workspace root.
- Review the current registration, attendance, program, budget, and readiness signals.
- Open every incomplete or warning item and inspect its source record.
- Assign an owner and due date through the appropriate project or CRM task workflow.
- Recheck the overview after the underlying work is saved.
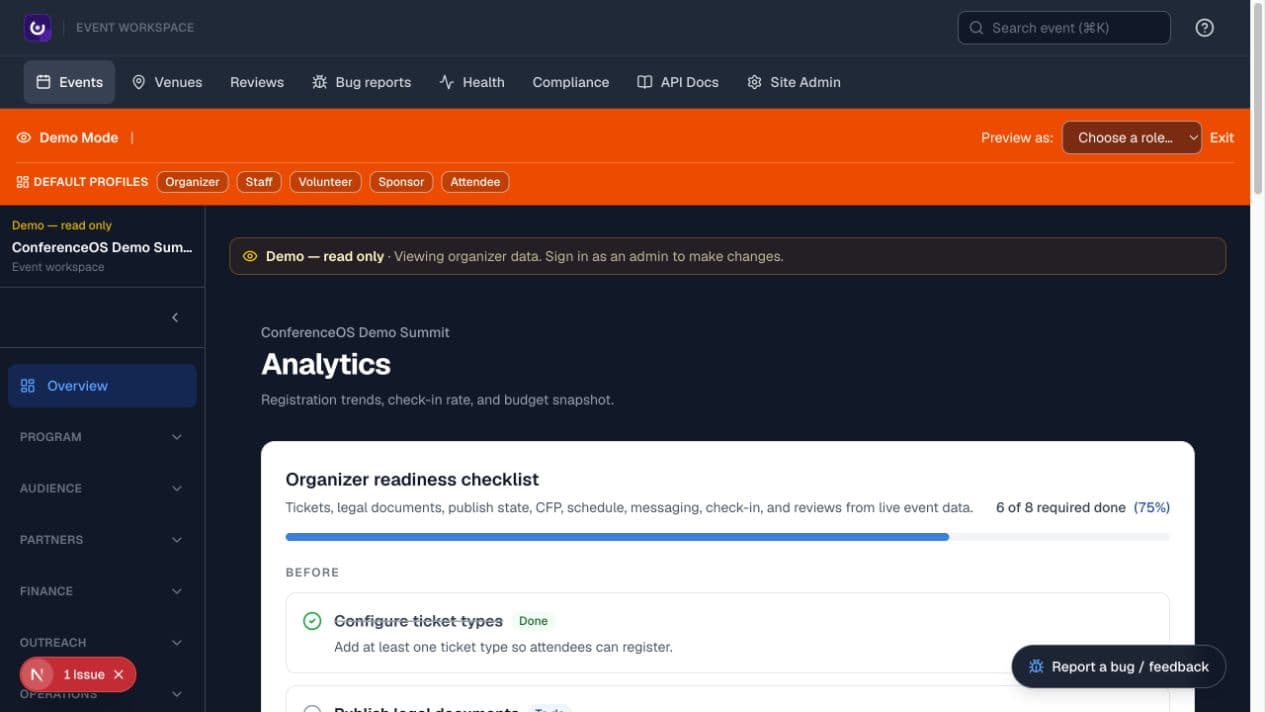
Figure 1 — The overview summarizes current event data; it is an operational starting point, not proof that every launch requirement has been reviewed.
A warning is not automatically a blocker, and a green summary is not evidence for external requirements ConferenceOS cannot observe.
Moderate reviews across events
- Open Reviews in the sitewide organizer navigation.
- Filter by event, moderation status, and rating before reviewing a record.
- Read the complete conference review or testimonial in its event context.
- Approve only content suitable for the intended public use; reject content that violates policy or cannot be attributed safely.
- Highlight a review only after its moderation status and event are correct.
- Recheck the affected public or recap surface after saving.
Review moderation does not grant permission to disclose private attendee data or reuse a quote outside its approved context.
Manage event projects and team assignments
Use Operations → Projects for bounded event work that needs status, dates, tasks, and ownership beyond a single CRM follow-up.
- Create a project with a specific outcome, event, owner, and target date.
- Add tasks small enough to complete and verify.
- Assign only event members who need the work and data.
- Update task and project state as work changes.
- Use Projects → Team to review event assignments and remove stale access.
- Close the project only after its outcome, not merely its task count, is verified.
Project assignment does not automatically grant site-admin, finance, support, or check-in permissions. Manage access through the supported membership model.
Configure the public navigation
- Open Operations → Navigation.
- Review event-header items and footer columns.
- Add, label, reorder, hide, or remove only links that belong to this event.
- Prefer event-local routes for ConferenceOS features and approved HTTPS URLs for external destinations.
- Test every result signed out and on mobile.
Navigation controls discovery, not record visibility. A link to a protected route remains protected, while deleting a link does not delete its destination.
Configure sitewide navigation
Use Site Admin → Navigation for links that appear outside a single event.
- Identify whether the item belongs in the site header or a named footer column.
- Use a concise label and an approved internal route or HTTPS destination.
- Order the item relative to the other installation-wide links.
- Save, then test the home page and another non-event page signed out.
- Verify the result on desktop and mobile and confirm that legal links still point to their intended documents.
Sitewide navigation affects every event hosted by the installation. It does not replace event-level navigation and does not make a protected route public.
Configure event integrations
- Open Operations → Settings, then select the named provider section, such as Slack or Discord. For site-wide provider setup, open Site Admin → Integrations instead.
- Read the displayed provider status before enabling event-level behavior.
- Configure non-secret mapping such as account, list, channel, board, or trigger only for the current event.
- Run the least-destructive available connection test.
- Verify the provider-side result without printing or copying credentials.
- Document which system is authoritative and how failures are handled.
Credentials stay in the deployment or provider's secret-management surface. An unconfigured integration must degrade safely and must not be described as active.
Review site integration status
- Open Site Admin → Integrations.
- Read the provider's configured, unavailable, or attention-required state.
- Open the dedicated provider page only when the installation owner has authorized configuration work.
- Use a status or connection test that does not send customer-facing content.
- Return to the integration hub and confirm the displayed state changed as expected.
The status page does not reveal secret values and does not authorize creating accounts, changing billing, rotating credentials, or enabling outbound sends.
Configure Slack or Discord notifications
- Confirm the site operator has configured the provider credential.
- In event Settings or Integrations, select the approved channel/server target.
- Choose only the event triggers the destination should receive.
- Send an approved test event.
- Verify event name, link, content, and channel on the provider side.
- Disable the integration if the channel changes or starts exposing event data to unintended members.
Notifications are copies outside ConferenceOS. Apply the destination's access and retention rules to the data they contain.
Operate continuing-education readiness
Use Operations → CE readiness when an event offers continuing education.
- Review the program, attendance, provider/license, evidence, and certificate readiness sections.
- Resolve each item through its authoritative event or operator workflow.
- Verify attendance and eligibility before any certificate or credit outcome.
- Keep a documented N/A case only when the event genuinely does not require that item.
ConferenceOS must not invent a license writer or claim a regulated credential is complete merely to exercise a technical workflow.
Handle compliance data requests
Authorized site operators can use /organizer/compliance/data-requests for supported privacy requests.
- Verify the requester's identity through the operator's approved process.
- Record request type, scope, receipt time, jurisdictional deadline, and owner.
- Use the supported export, correction, restriction, or deletion workflow.
- Review the result for event and identity scope before release or execution.
- Record completion evidence without putting exported personal data into an issue, chat, screenshot, or public log.
Identity verification, legal deadlines, exceptions, and destructive production operations remain owner/operator responsibilities. A UI action is not legal advice.
Configure site identity and organization settings
- Open Site settings and review the current organization name, public identity, contact information, branding, and installation defaults.
- Change only fields whose installation-wide consequence you understand.
- Preview public identity and branding on a signed-out page.
- Confirm that event-specific branding still belongs to the event rather than the site default.
- If the page reports a pending schema requirement, stop and use the approved migration process instead of trying to work around it.
Site settings affect the installation, not only the event you most recently opened. Secrets, domains, billing, and schema work retain their separate gates.
Manage karma activities and achievement badges
- Open Site Admin → Karma activities to review reusable activity types, points, visibility, and lifecycle state.
- Create or edit an activity only when its user behavior and scoring outcome are clear.
- Open Achievement badges to review badge criteria, imagery, and status.
- Confirm that an activity or badge is active only when the corresponding product behavior exists.
- Test with fictional or approved test data before exposing a new reward to real users.
Changing a catalog definition can affect incentives across events. Do not use a badge or score to imply certification, entitlement, or regulated achievement.
Review site hardening
- Open Site Admin → Site hardening.
- Read each control's current state, evidence, and recommended follow-up.
- Separate application controls from provider, DNS, secret, or deployment work that must be completed elsewhere.
- Resolve a finding through its authoritative configuration or code path.
- Refresh the page and record the verified result without copying secret values into tickets or screenshots.
A green hardening summary is not a penetration test, legal conclusion, or authorization to weaken a control for convenience.
Manage site access and administration
Open /organizer/admin only as an authorized site admin.
- Review system and integration status before changing access.
- Grant event membership or narrow roles according to the person's job.
- Prefer the
checkinrole for check-in-only staff and event-scoped access for organizers, reviewers, sponsors, and agents. - Remove temporary accounts, invitations, report links, and API keys when the work ends.
- Recheck access from the affected role rather than relying only on the admin display.
Do not solve a missing feature by granting sitewide admin. Escalate the product or configuration problem while preserving least privilege.
Site Admin → Users & roles lists everyone with site admin, event team, or MCP access in one place, and is where you add, change, and remove that access. See Users and roles for what each role allows.
Inspect system identity
- Open Site Admin → System.
- Compare the displayed application version, commit, deployment identity, and runtime status with the environment you intended to inspect.
- Use the links and copy controls only for non-secret identifiers.
- If the version is unexpected, investigate the release record before making any configuration or schema change.
The System page is evidence about the running installation; it is not a release button and does not authorize production promotion.
Apply a controlled application update
- Open Site Admin → Updates and read the installed and available revision.
- Review the release notes, database compatibility, rollback path, and current event freeze window.
- Obtain the required release and schema approvals before starting an update.
- Run the supported update action once and keep the page open for its final result.
- Verify the new version, health checks, public routes, and rollback readiness.
Never use Updates to bypass branch promotion, production migration, provider, or owner gates. A failed or interrupted update requires the documented recovery procedure rather than repeated clicks.
Publish counsel-approved legal documents
- Open Legal documents and select the intended sitewide document.
- Confirm that the Markdown was approved for this installation by the appropriate owner or counsel.
- Preview formatting and links without changing the meaning of the supplied text.
- Publish only the approved version, then inspect its public route signed out.
- Record the approval source and effective date outside the document body when required by the organization's process.
ConferenceOS templates are placeholders, not legal advice. Do not draft, reinterpret, or silently publish customer-facing legal language through this workflow.
Use Demo Mode and test controls
Demo Mode presents fictional events and role-shaped interfaces without requiring a real account. It covers event-scoped preview surfaces; site administration and some sensitive event pages still require a real administrator sign-in. The picker includes Organizer, Staff, Volunteer, Sponsor, and Attendee previews. Speaker, Reviewer, and Promoter use the entry points described in their role guides. The orange banner identifies the session, and server guards reject mutations.
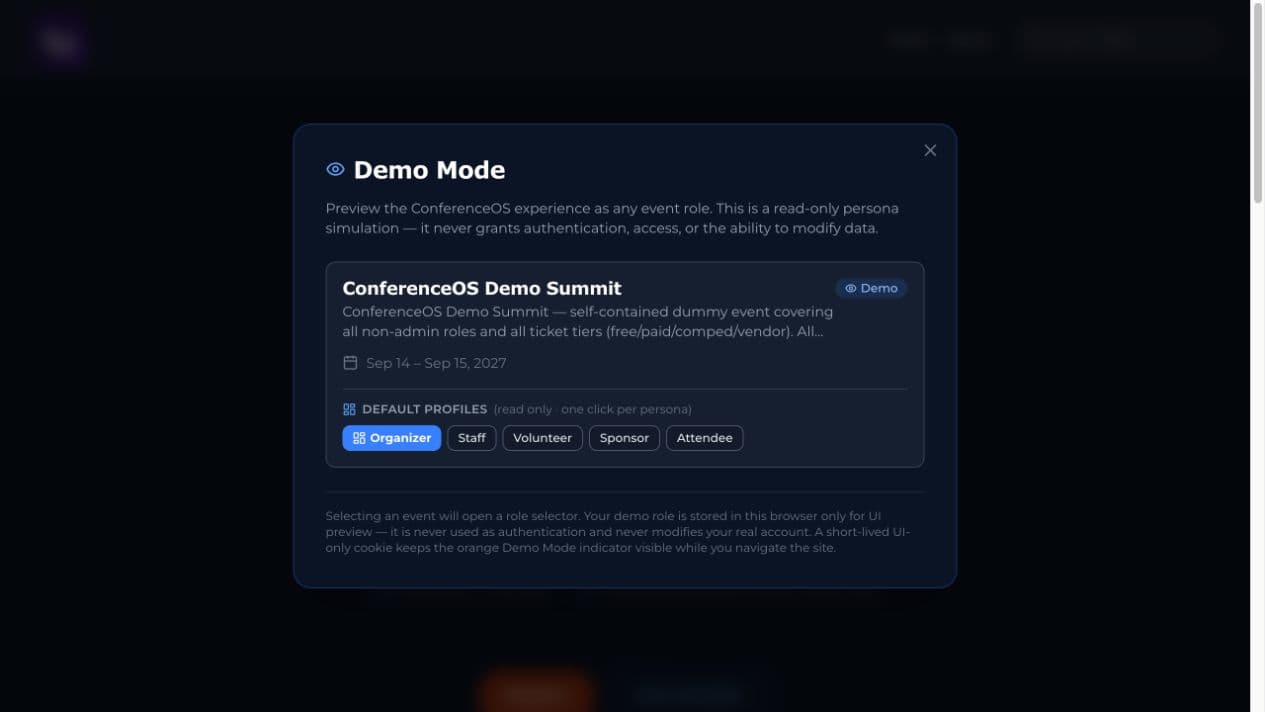
Figure 2 — Demo Mode lets an evaluator choose a fictional event and role without receiving live write access.
- Start from the Demo Mode event/role picker.
- Choose the role and event you want to understand.
- Navigate the available event-scoped interface and note the read-only banner.
- Do not interpret visible controls as proof the preview can mutate data.
- Leave Demo Mode and sign in with an authorized account for real operations.
QA Mode and test controls are operator tools, not a workaround for production permissions or provider configuration.
Connect an AI agent safely
ConferenceOS exposes role-filtered MCP tools at /api/mcp and a versioned organizer skills library under plugins/conference-os-admin/.
- Turn on MCP access for the person in Site Admin → Users & roles, or create an event-scoped API key with only the required
mcpscope. - Store the key in the approved client secret store; never paste it into chat, documentation, screenshots, or source control.
- Connect the MCP client and inspect
tools/listfor that principal. - Start with read-only discovery and one event.
- Dry-run any batch-capable workflow, review the proposed event, records, and count, then confirm only the intended write.
- Revoke the key when the task or operator relationship ends.
See Running your conference with an AI agent for client setup, roles, skills, design-contract use, and safety boundaries.
Use reports for operational handoff
- Choose a report that matches the handoff question.
- Verify event, time range, fields, and data sensitivity.
- Prefer an authenticated view for internal operators.
- If a tokenized report is required, test it signed out and treat the URL as a bearer credential.
- Include as-of time, filters, owner, and next action with the handoff.
Do not paste report tokens or attendee exports into public project tasks or AI prompts.
Triage submitted bug reports
- Open Bug reports and filter by status, source, type, or page.
- Read the report, page context, reporter details, and available screenshot without exposing personal data in a public issue.
- Reproduce the behavior in the matching event and role when it is safe to do so.
- Link or create a GitHub issue only when the report is actionable and does not contain secrets or private customer content.
- Update the report status and preserve the link to the resulting work.
Marking a report resolved means the reported outcome was addressed or deliberately dispositioned, not merely copied into another queue.
Monitor site health
- Open Health and confirm the environment and observation window.
- Review aggregate status, top 404 paths, and outbound-link failures.
- Open a failing route or destination only when doing so is safe and expected.
- Distinguish a transient provider failure from a reproducible application or content defect.
- Record a bounded follow-up with the route, time, environment, and evidence.
- Refresh after remediation and confirm the observed failure no longer recurs.
Health signals are operational evidence, not permission to deploy, rotate credentials, change DNS, or suppress a failing check.
Close an event operationally
- Reconcile registrations, attendance, provider imports, refunds, and support.
- Complete sponsor, partner, vendor, volunteer, media, and speaker obligations.
- Publish only approved recordings, slides, reviews, and recap content.
- Finish or reassign open projects, CRM tasks, and support cases.
- Revoke temporary roles, invitations, report links, API keys, and integrations.
- Apply retention, deletion, accounting, and incident-review policy.
- Move the event to the appropriate completed lifecycle state only after the public and operational consequences are understood.
Troubleshoot operations and administration
- A readiness item stays incomplete: change the authoritative source record, then refresh; do not edit a summary to mask the problem.
- A teammate cannot open a page: verify event membership and exact permission before expanding access.
- An integration says unavailable: check operator configuration and event mapping without exposing secret values.
- A notification went to the wrong channel: disable the event mapping, assess exposure, correct it, and run a narrow test.
- Demo Mode appears writable: verify the banner and server result; visible controls can be part of the realistic preview while mutations fail closed.
- An agent lacks a tool: inspect
tools/listand the principal's role; do not replace the key with site-admin access as a shortcut. - A data request is ambiguous: pause destructive work and obtain identity, scope, legal, or owner clarification.